How to Make Personalized Kindergarten Favorites Keepsake Photos
Make cute end of the year photos for your kindergarten students. Here’s how to photograph, make and print personalized photos for each of the kiddos in your class.

It’s fun to do a special thing or two to celebrate the end of the school year. I think this “My Kindergarten Favorites” overlay is a fun option to show who they are at this point in their five and six-year-old lives.
What is it?
Don’t know what an overlay is? No biggie – think of it like a sticker that goes on top of your photo – only you put it on top of the photo using your computer.
I’ve made overlays for mother’s day, the 100th day of school, overlays for our ‘S day’ class photo, and ones for each month of the year.
And in this case, this kindergarten favorites overlay ends up being an editable one. And it’s free.

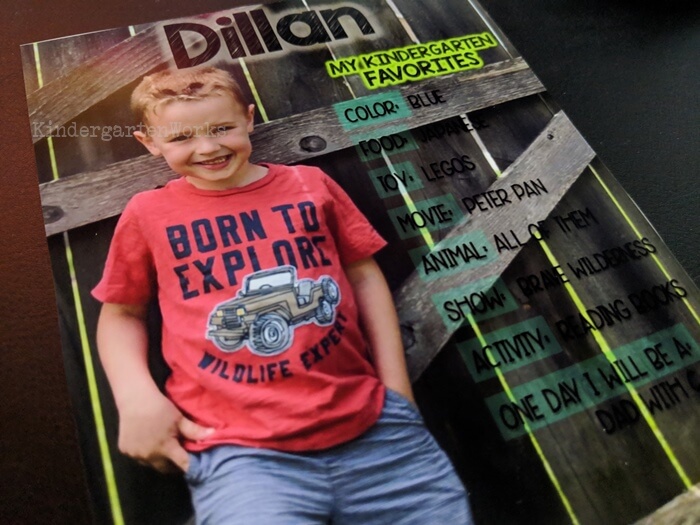
The printed result is super cute. It’s kinda like a magazine cover!
The inspiration came from these ‘favorites’ posters.
Ready? Let’s jump in and make these for your class. Here’s how to do it.
1. Interview your students
To get started, you’ll want to find out your students’ favorite things.
So ask them – what’s their favorite: color, food, toy, movie, animal, show, activity, and finish off by asking something they picture themselves being someday.
It doesn’t have to be the traditional “What do you want to be when you grow up?” But it could be.
Do you have a buddy class or a class or older students that could “interview” your students for you? This would be an awesome way to get your answers quickly and all written down for you.
2. Take photos of each student
Grab your phone or your camera and head outside. Or pick a spot near a window indoors.
To get a photo that looks great with this “my kindergarten favorites” list on top means you need to consider these 3 things when snapping away:
- lots of natural lighting nearby
- a neutral background
- the student posed off on the left side of your camera’s frame
So, I’d recommend a wooden fence, brick wall or wall with siding as your neutral backgrounds. It will allow the focus to remain on your little cuties.
Students can cross their arms, put one leg up on the wall or put a hand on their hip. A little pose will look great.
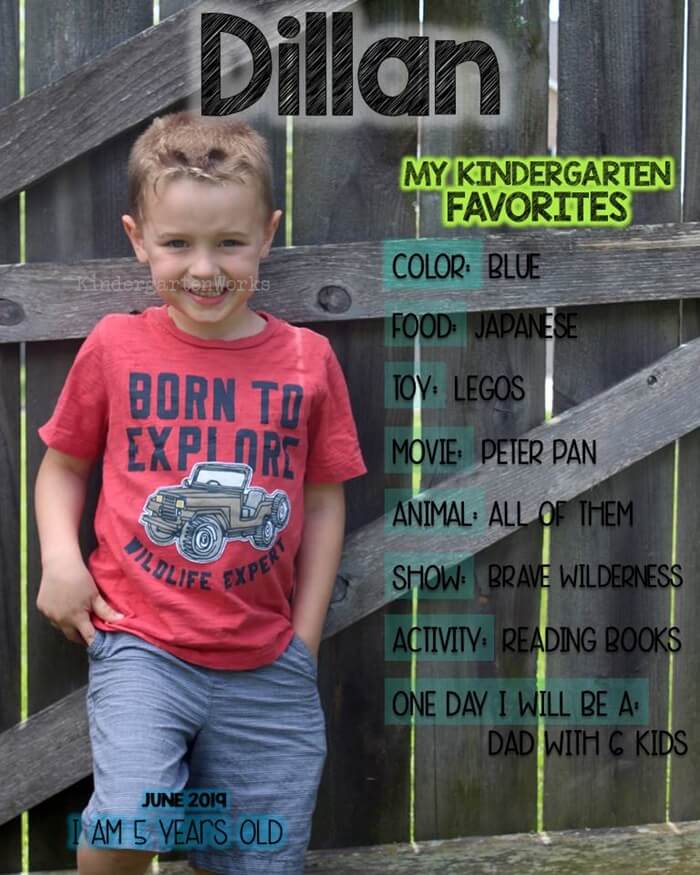
You want your students to be on the left-hand side of your camera’s frame so that there is essentially half of the viewer/screen empty. That’s because you want that empty space to be covered by the list of their favorite things and you don’t want those covering up your students’ faces.
3. Put it together on the computer
Now that you’ve got your adorable photos of your students – it’s time to put them onto your computer and let’s get making!
You’ll need either Microsoft PowerPoint or Google Slides to edit the overlay.
► Prepare your files
Have your photos on your computer where you can easily access them.
Download and install the matching fonts (or use your own favorites) Here is the: title & name font and list font you see used in my examples. [How do I install a font?]

► Make pages for each student
Download this file and open it in Powerpoint or upload it to Google Slides. You agree to these terms of use by doing so. [downloading help]
These directions are written for Powerpoint, but it’s very similar with Slides too.
- Change the date at the bottom of slides 1 and 2 (if needed) and/or change any fonts or font colors. See my note below*
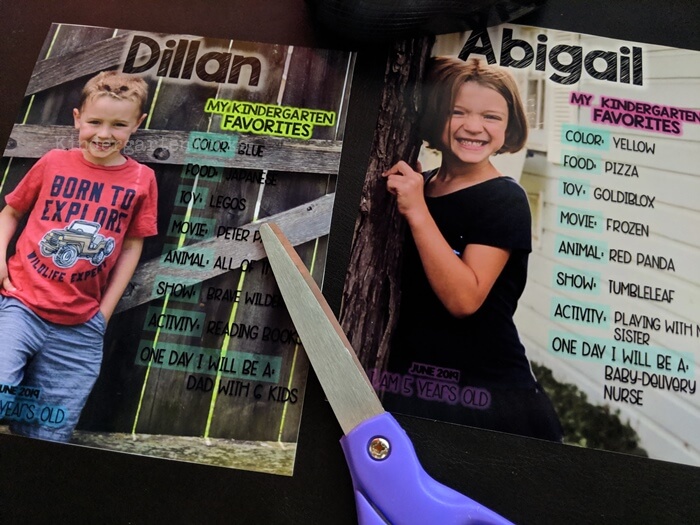
- Duplicate the girl page [slide 1] for the number of girls you have and duplicate the boy page [slide 2] for the number of boys you have in your class. Right-click on the slide (over in the left-hand list of all the slides) and click ‘Duplicate Slide’.
- Change the background images:
- Right-click on the slide
- Select format background
- Choose Fill > Picture or texture fill > Insert from: > File…
- Select your student photo
- Click the next slide (from the left-hand list) and choose your next student photo by clicking the “File” button again. Repeat until all photos are replaced. Choose “Close”
- Go back through each slide and type in the favorite things for that student and their age
*Something to consider – if you chose a darker neutral background (like I did in the sample boy photo) then you might want to change the font color from black to white to make your text show up better before you duplicate the pages [step 2]. Replace the sample photo [step 3] with a photo you took to test out which color will stand out the best.
► Print your pictures
If you want to print full 8.5×10 photos – you can go to File > Print. Just be sure that “Color” is selected and not “Grayscale” to make sure your backgrounds are printed.
If you want to print easily in another size or send these photos to parents digitally – here’s how you do it using PowerPoint.
- Go to File > Save As
- Go to “Save as type:” and choose JPEG as your desired format.
- Click Save
- Choose “Every Slide” from the options that pop up
- A folder has been created with each of your photos in it. Go find that folder and select them all and print or share!
There – you’ve got what you need to make some stinkin’ cute end of the year photos that are personalized for each of your kindergarten students. If you teach pre-k or first grade, you could adapt these by changing the text since these are editable.
So – give it a try – use them tomorrow.
Alternative options
We know all too well that the end of the school year is packed full of things like:
- abc countdowns
- doing report cards
- mother’s day
- giving info to first-grade teachers
- end of the year celebrations
So you could save this cute photograph until the end of the year… or you could take photos for each student during their birthday month and give it as a birthday gift. Just a thought.
But – you could also consider doing these as a memory book alternative – treat it like a yearbook page and let everyone sign the back. Boom.
If doing so much on the computer isn’t your style – or if you would rather just snap a photo and print them – then I’ve got your back. Take a photo with these cute photo prop signs that say, “Future First Grader” and you’ll be set to go!
Let’s wrap it up
There you have it – how to make cute end of the year photos for your kindergarten students. I hope those directions on how to take photos, make and print your personalized photos were helpful.
If you like what I do here on KindergartenWorks, then be sure to subscribe today. I look forward to sharing ideas with you weekly.