
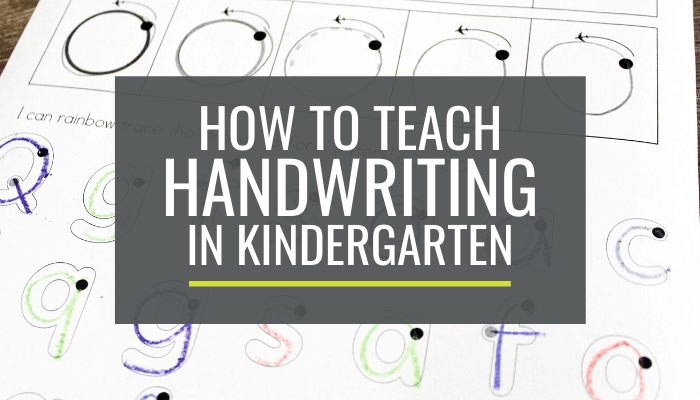
Breaking It Down – How to Teach Handwriting in Kindergarten
Teach handwriting in kindergarten by starting early and working smart.
Here are the four basics to teaching handwriting in kindergarten — so that all students can form letters successfully and without stacks of worksheets.
At first, I’ll admit, I was frustrated by being told to teach handwriting when the common core standards rolled out. These are the two standards I’m talking about:
- K.L.1.a-3. Print all uppercase letters.
- K.L.1.a-4. Print all lowercase letters.
Despite my initial frustrations, I chose to teach letter formations and get smart about it.
Here’s what I did:
- I increased the intensity of our practice and got laser-focused.
- We practiced less often – but practiced in smarter ways.
By doing these two things, I saw less hesitation in general from my writers and I did less re-teaching throughout the year.
Let me share how I increased the intensity and practiced smarter in four basic steps so that you can nail this one in your classroom too.
We started early
One thing I did was start early in the school year. I teach handwriting starting the second or third day of school.
Why? Because they haven’t had time to develop incorrect habits.
I taught a letter a day. This included how the letter looked and sounded but my main focus was on how to form the letter.
This obviously took 26 of those first school days to cover the entire alphabet but it works.
We skywrote with our fingers, noses, toes… anything to keep us moving those first days of school!
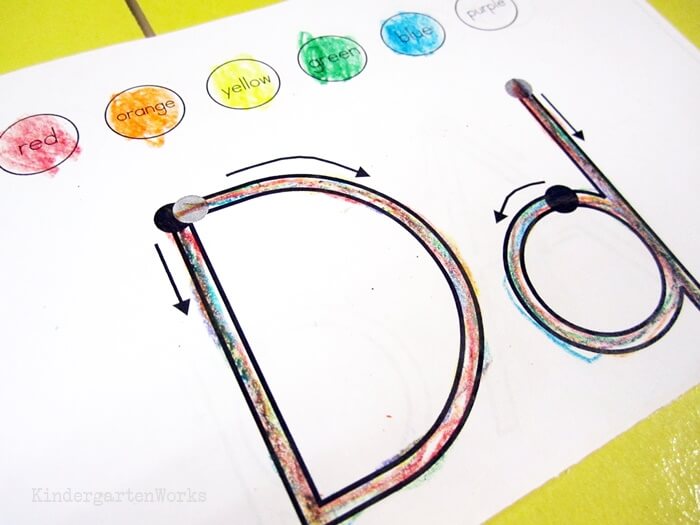
Then, the following morning students rainbow wrote the new letter using the correct formation. Using each color of the rainbow they traced and formed the letter in our “rainbow books.“
It was much more kinder-friendly than any typical “worksheet” and was easy to implement.
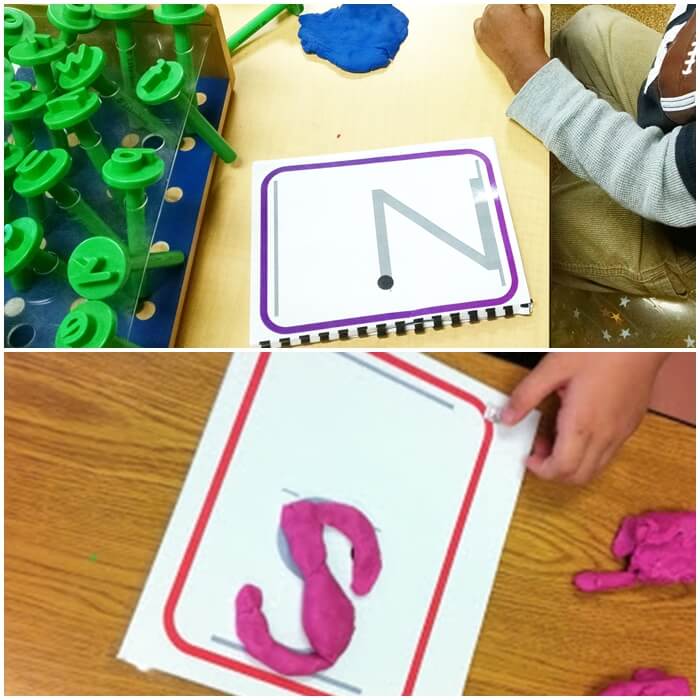
After that initial introduction – I placed letter formation cards in our playdough word work literacy center to reinforce our learning.
We created songs
Teaching a sing-songy way to form each letter while describing the strokes really helped set the stage for making the letters stick early on in the school year.
If you break handwriting down – you can easily see that there are a few main strokes we use in print.
- backwards circle
- go up
- straight down
- trace back up
- slide down to the left
- slide down to the right
- make a hook
The combination of these strokes (or some letters have slight alterations of them) means that we can pretty much learn how to form and print any letter by mastering them.
Want to see what I mean? Here’s a video sample of the letters – listen for the same strokes used over and over!
Can’t see the video? Be sure you’re not running an ad blocker.
Learning to sing or chant a sing-songy version of the strokes makes it easier for kindergartners to remember.
We focused on the strokes
Since handwriting can easily be broken into familiar strokes – I wanted to bring focus to those.
I wanted to make the connection obvious to my students how many letters use those strokes.
I want them to see how successful they could be (and how many letters they can form) just by learning one stroke!

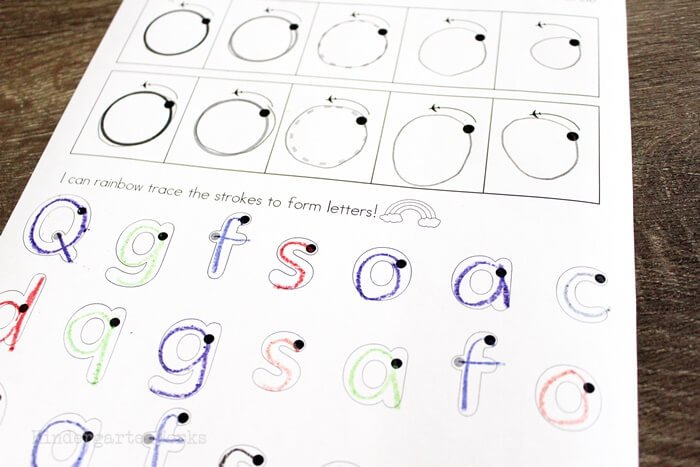
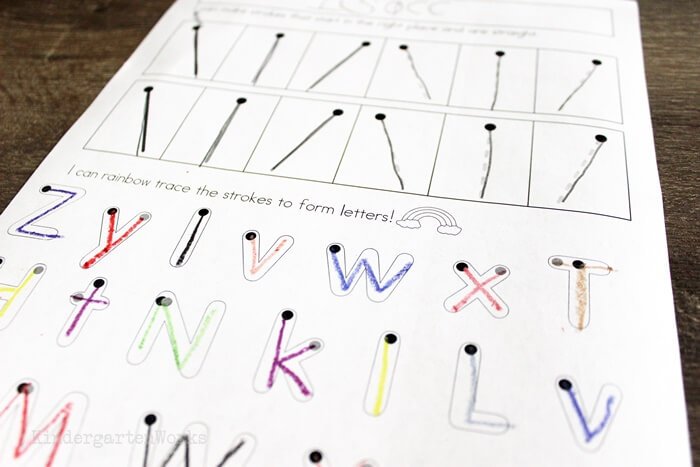
So I made three simple sheets to practice all of the letters grouped by their formation strokes. We did these in small groups so I could better watch how students were holding their pencils and forming the letters.
The top portion practices the simple stroke and the bottom is the letters that I think help practice the stroke best.
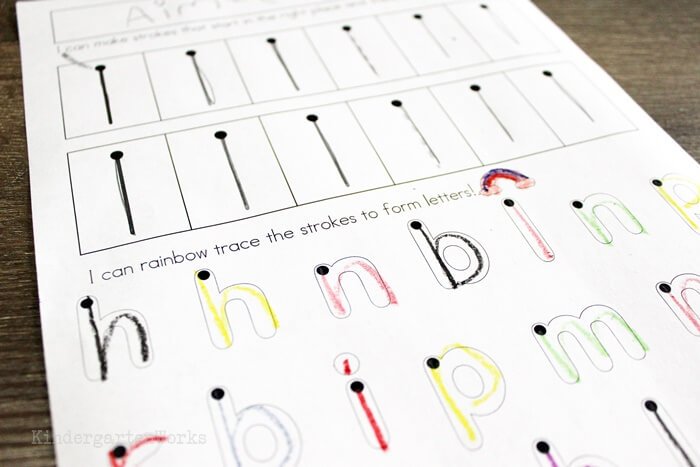
At the bottom, my kinders had to change crayon colors when writing each letter.
This was almost mean, but it works.
They have to almost hit the “reset” button in their brains to think, “What kind of stroke was I making?” when putting their new crayon to the paper.
If they simply use the same color, they go on autopilot and focus less on what their hand is actually doing.
You can download these three simple handwriting worksheets below.
We didn’t just practice the strokes on these sheets that went home.
I kinda loathe worksheets so we also practiced in our small groups on whiteboards, in paint bags, and with playdough…
[terms of use] [downloading help]
We continued on
Let me share how we continued working on handwriting intensely but without spending more time than we would’ve in the past just doing curriculum worksheets.
Strokes practice
After I taught all 26 letters over 26 school days – we spent a short stint on the vowels. Immediately after that though, we began hitting a letter formation pattern as a focus during a whole group work time.
And that’s when it hit me — We use an alphabet chart and a sight word chart for daily whole group work… why not a handwriting chart?
So I made a few handwriting posters (giant-sized) and we used one of the four main strokes as a focus for a week.
One of the keys is that we kept it active!
Skywriting with fingers, noses, toes {whatever} helped students feel the formation of the letters. We even went on a hunt around the classroom for letters with the pattern.
The sing-songy strokes became something that connected the whole class and gave us all “one language” to speak about forming letters that we used whole group, small group and when I was working with someone one-on-one.
Fine-tuning for each student
The awesome thing is that this approach to teaching handwriting in kindergarten is easy to fine-tune on a student-by-student basis.
Here are some ideas:
- Pick one letter or one stroke to focus on in a student’s name to help them start with that most basic-writing need.
- Use this awesome handwriting font for kindergarten to help your young writers know where to start.
- Focus on where the letters start by using black dots, gray dots, and super light dots to show the sequence of strokes.
- Create handwriting workmats or pick one or two handwriting letter worksheets to use with dry-erase or vis-a-vis markers to practice what’s needed most.

Assessment
Since I was going to teach the standards – I knew I needed to also assess my students. How could I test if everyone could print 100% of the letters?
To be honest, I tried some things that didn’t work and finally figured out what did!
It really helped me be laser-focused on helping students with just what they needed and not spend time on what they didn’t. And isn’t that working smart? It is in my book!
Read more: how to assess handwriting in kindergarten >>
Let’s wrap it up
With this simple approach to teaching handwriting in kindergarten – by breaking it down to letter formation strokes – we get super close to all students being at 100% of forming their letters early on. Plus I see huge gains in both writing sight words and writing in general.
So, with some focused practice that I felt was smarter than I’ve done before, I am one happy teacher to celebrate the little moments of mastery with my kinders.
Ready for some tips to make teaching handwriting easier?
If you like what I do here on KindergartenWorks, then be sure to subscribe today. I look forward to sharing ideas with you weekly.

Please let me know if this handwriting program is geared towards left handed writers. Are there established points on each letter? It’s my experience that the start/stop positions are different for right vs left.
Thanks for your response.
This style of teaching handwriting does work with left-handed children but it is not designed specifically for them. It is designed to teach students to learn to write all of the letters based on a few basic strokes that end up making all of the letters. There is no stop button, only a start button that is used temporarily as you are teaching students how each letter is formed. The start button is not in the location that differs for left-handed children.
– Leslie
I see each lowercase letter ha a sheet to print out for students to practice. These have helped some students that I tutor. What do you use for uppercase letters? I hope that there are sheets to print out for them. Let me know.
Thank you SO MUCH for this resource! You mention 4 posters that you made, but there are only 3 on the download. Is there a 4th that I’m missing somewhere?
Ahhh – the poster can be found in another post! Go here to get them and learn more about handwriting this way: https://www.kindergartenworks.com/teacher-tools/handwriting-strokes-posters/
Thanks,
Leslie
Oh, thank you so much for sharing these for free! As a first year teacher, I am SPENT when it comes to buying things to help my K, 1, & 2 EBD students learn. I knew what one of my little guys needed, but didn’t know how to find it. THIS is it! Thank you a million times over!
The link to the worksheets does not seem to work any chance, I can get it sent to me. Thank you your time, by the way I had no trouble with the posters,
What order do you do the letter each day?
I see your work sheets go by “stroke”. Do you teach letter a day by similar strokes?
Is handwriting a consideration as you teach the letter a day – or is it sounds?
Thank you!
Hi Calli,
We taught the letters in this order: MSTDA NFPGHIJO BWLIRUCK EQYXZ. This allowed us to teach letters that looked and sounded different from each other right up front and save the lesser-used and sometimes harder-to-produce sounding letters until the end when students are more comfortable with learning letters. The handwriting was not necessarily the main consideration – it was more about the sound and popularity of letters to get us started. After we run through the entire alphabet, then we circle back to teaching a clump of letters by similar strokes.
– Leslie
Hi Leslie.
Thank you for sharing! I’m an occupational therapist and I pretty much do this in the moment daily by having students trace a highlighted letter with starting dots. I was excited to see that there was a font out there for it. After downloading, I did notice that there appeared to be some differences with the formation for some of the letters compared to how I teach my students. Perhaps you may be following a different protocol for letter formation than I typically utilize with my students. I am aware that there are different programs for teaching letter formation as well as different letter styles (i.e. De’Nelian vs. Handwriting Without Tears). I typically use the Handwriting Without Tears curriculum. I noticed that for the uppercase letters, G, I, J, and Y were formed differently using your font. I am curious as to why you selected the font style you did. I would like to hear about your process in making this font.
Do you have the words to the songs available for download?
Hi Paula,
I don’t – but I hope in the future to make this easier to use and broken down into smaller, bite-sized materials. Thanks for asking!
– Leslie
Thank you so much for this download!
Hi Leslie,
Thank you for the downloads. I as wondering if the handwriting video is available for download? Due to the virus outbreak in China, I’m currently giving online lessons to my students. It will be great if I am able to share the video with them.
Thank you for sharing all your wonderful resources! God bless your generous spirit.
Hi what is your sing songy stroke tune? How do you sing each letter stroke? Great product!!!!!!
Any advice for a lefty? Letters are formed different, pencil is held different. And we are hitting a wall with our kindergarten teacher. My son has had a crayon, pencil, or marker in his hand since about the age of 2. Now she is trying to retrain him. He is so frustrated he no longer wants to write because he does it wrong. Help.
Hi Kimberly, I would always go to our school’s occupational therapist (OT) in cases like this if I needed support – so here are some tips from an online OT mama who may have some good starter tips! https://teachmama.com/teaching-left-handed-kids-write-grasp-stages-positioning/ If you haven’t already opened up the channel of communication with your child’s teacher – I would highly recommend starting there and asking for creative ways to work on it at home as well as in school (to be on the same page) but make progress you are both happy with!
– Leslie
I really want to have these printables but have no idea how to access them. I keep clicking and clicking to no avail. I just have a ton of files open on my laptop. HELP ! I follow you consistently and love the way you think and work smart. Please help me to get these printables. I start tomorrow !!! HELP !
Thanks Dayna for your compliments – it’s fun to connect with others who think the same way and like to work smart too. Yikes, I’m not sure why it’s not working for you. Perhaps try a different web browser like Google Chrome or Firefox just in case that’ll solve the issue quickly! I hope you have an amazing first day!
– Leslie
Wow Leslie! Thank you for the downloads.
I’m a former K teacher and volunteering in some local classrooms. My first assignment is to help students that are struggling with writing. It’s been a long time since I was teaching so I got online to find some new resources and ideas. The sheets, posters and outline font will be very helpful. I downloaded the free strokes sheets and got 3 but would still like to have the one for letters/strokes that lift back up. It wasn’t part of the download. Is it available?
Hi Karen,
No, oddly enough – there isn’t one for that! Maybe I made it that way since many of those letters show up in 2 of the other worksheets? Maybe – it’s been quite a while since I created them. So glad you can find that useful. Enjoy volunteering!
– Leslie
I just found your handwriting strokes sheets. These are AWESOME! I am taking a handwriting class and I think your papers are better than anything I’ve learned in the class so far. Thank you, thank you! I am so excited to try them out with my class!
Wonderful Shelli – I’m so glad to hear it! Thank you for taking the time to let me know you appreciate these and I look forward to hearing how they go with your class.
– Leslie
HI there.
I really like your handwriting work sheets. I’m just curious why you call the a page of letters “Backward Circles”? I want the children to start exactly where you have the black dots. (down left back up right side)
> a, c, d, e, f, g, o , q, s < all these letters start with a correct formation of the "c". We call it the "magic C".
Anyway, just curious, if I'm missing something.
Thanks,
Susan
Hi Susan,
I’m glad you like the handwriting sheets! I think that the formation of both backwards circles and forward circles was just my way of differentiating the direction my kiddos go when forming letters. I must’ve picked up that language from an old handwriting curriculum. We use forward circle for b, p, r but those ones seem to take care of themselves when my kinders get the “trace back up” letters under control since they all include that type of first stroke. Hey, if magic c works – that’s awesome! Thanks for sharing the way you do it!
– Leslie
Thank you thank you! Amazing!
Thanks Kristin, glad you found it helpful!
– Leslie
Thank you so much for sharing all your wonderful ideas and resources. However in our district we use modern print. Would you be able to make them using a modern handwriting font or could you give me the info and guide me so I can make them for my kiddos. Thank you for you help in this matter.
Thank you so much for sharing these fabulous handwriting resources! I appreciate you sharing your hard work 🙂
Jessica – thanks for taking the time to share your thoughts! I’m so glad you think that these items are fabulous – I love hearing that!!
– Leslie
Thank you so much for sharing these great resources! This will help me out a ton with my kinders!
Wow! This is so awesome! I was just noticing that my kindies really need some additional reinforcement with their handwriting. Thank you for sharing! Tina
Thanks Tina for sharing your thoughts. So glad to hear that your kindies will be able to get some great use out of these things!
– Leslie
Thank you for sharing! I love these!
What’s Working This Year?
Thanks Laurie for stopping by! Have a great rest of your day
– Leslie
These are fantastic Leslie and will be perfect for my little ones. They need lots of extra practice with their basic strokes, so these tools will be perfect. Thanks so much for sharing them! Hope you are doing well! ;o)
Thanks Julie! Things are going great and I’m super excited about Christmas season being here. In my world I celebrate Christmas as long as possible! 😉 Thanks for stopping by!
– Leslie
Thank you!!
Thanks for sharing your gratitude Anjanette!
– Leslie
I have really gotten a lot of mileage out of your dot font since you posted it, and was very excited as I read this post – and ready to pony up the cash to pay for the products you wrote about. These are some of the most worth-while handwriting products I have seen. I am flabbergasted and SO grateful that you are offering them to us as freebies – THANK YOU! Now I will need to head back to your store to find a way to express my gratitude in other ways… 🙂
Erin
Erin,
You’re such a sweetheart! I am so excited to hear that the font is a tool that you have found to be super helpful. That’s awesome! Your comments made the work put into this post feel worth it, so to you, I say THANKS!
– Leslie